
iPhone App Development - TableView with SwiftUI
What is it?
Swift is the current language for creating iPhone applications. It works within Apple's Interactive Development Environment (IDE) XCode. It is a combination of visual and programming interfaces.
Why should I learn it?
The world is mobile. While many content applications can function on phone browsers, there are some applications, like games, social media and ecommerce, that need native functionality.
What can I do with it?
You can create the visual interface as well as add code to represent functionality of your application using Swift and XCode. Then you can test and upload to Apple's App Store.
How long will it take?
Learning application development is a different and bit more difficult than creating websites. These tutorials will take several weeks to go through to explain the basic functionality available for application development. But with time and practice, you can master the skills necessary to create functional applications. Beyond iPhone development, there is native Android development and cross-platform options like React Native to consider.
SwiftUI
In 2019, Apple introduced a new method of app development called SwiftUI. It is a more code-based approach with a graphical user interface within XCode that executes while you code. This is different from the Storyboard method in which you use a combination of Storyboard objects and code in ViewControllers, and then execute it in the Simulator. Both Storyboard and SwiftUI are available for App Developers, and many thousands of apps have been developed with Storyboard. But SwiftUI is the way that Apple expects developers to work in the future. We are going to create a similar application as we created in the Storyboard TableView tutorial, but now using the SwiftUI method.
Reading Data From an Array
We will use the same data that we did in the Storyboard exercise. There are many ways you can work with data in an iOS app. By including an array of objects (similar to a JSON object) in the app, you can read those elements. You could also use a simple array, but in this exercise, we will demontrate the functionality of multiple variables read into a table, including images and maps. Ultimately, the table items will link to a detail view. We will work on an app that reads info about restaurants and presents them in a VStack, a vertical stack of information. To put items next to each other, we will use HStack, or horizontal stack.
Start with a new iOS App project. (File, New, Project, App, make sure you choose Language: Swift & User Interface: SwiftUI). This is where we indicate the use of SwiftUI. Name the project "TableSwiftUI".
When you come into the project, you will notice things look a bit different. We have a code window that is known as ContentView in the Project Navigator. And you have a screen that has a working Preview of your app. If you lose this screen, you can choose Editor, Canvas to get it to appear again. You can and should still use the Simulator to test the app, but the Preview gives you a live view while you work.
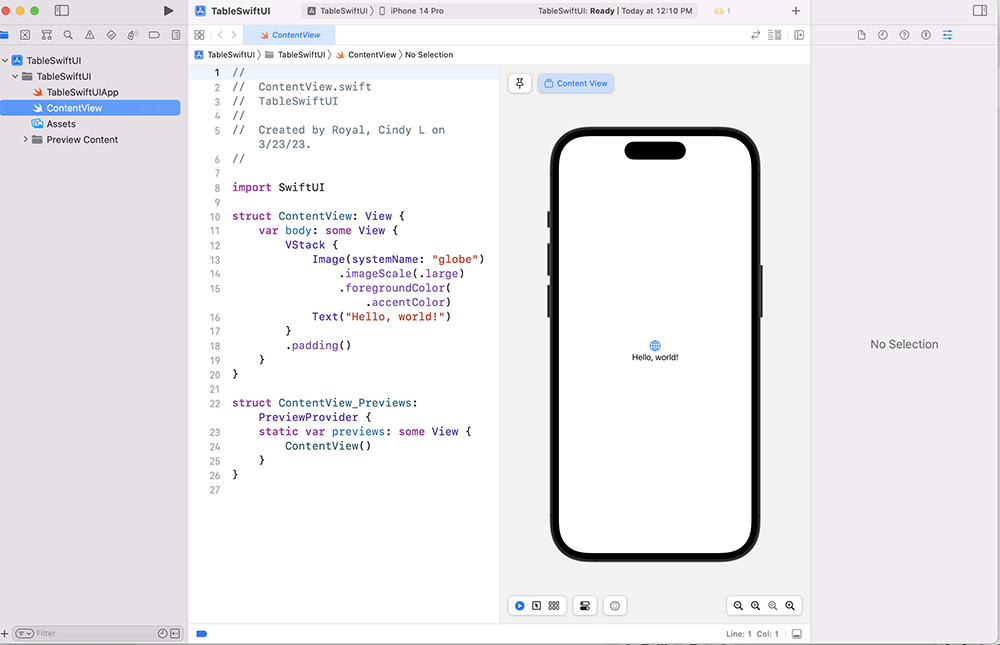
In the ContentView code, you will see a struct for the View and one for the Preview. We will mostly be coding in the View. You may need to refresh the Preview while you are coding to see the current interface. First let's get our data in the app. See the code to the right. It is a list of a few restaurants in Austin. It includes a description, lat and long coordinates and a reference for an image for each item. The data and struct will go above the ContentView and below the import statements, so we can have access to it throughout this file. SwiftUI handles everything programmatically in the ContentView. Notice the struct Item is referenced with the Identifiable protocol. This protocol requires an id variable, which is automatically generated for our dataset.
You will notice a simple Hello World display when you view the initial code in the ContentView. That view includes a "var body: some View" that has a VStack (vertical stack) placement of the items. SwiftUI uses VStack and HStack (horizontal stack) commands for relative layout, and you will see those items in the code samples. We will be coding within the "var body" of the view. The items with periods in from of them indicate the various options for the varous items of the interface, like text or images.
Include these items below the "import SwiftUI" statement in the ContentView
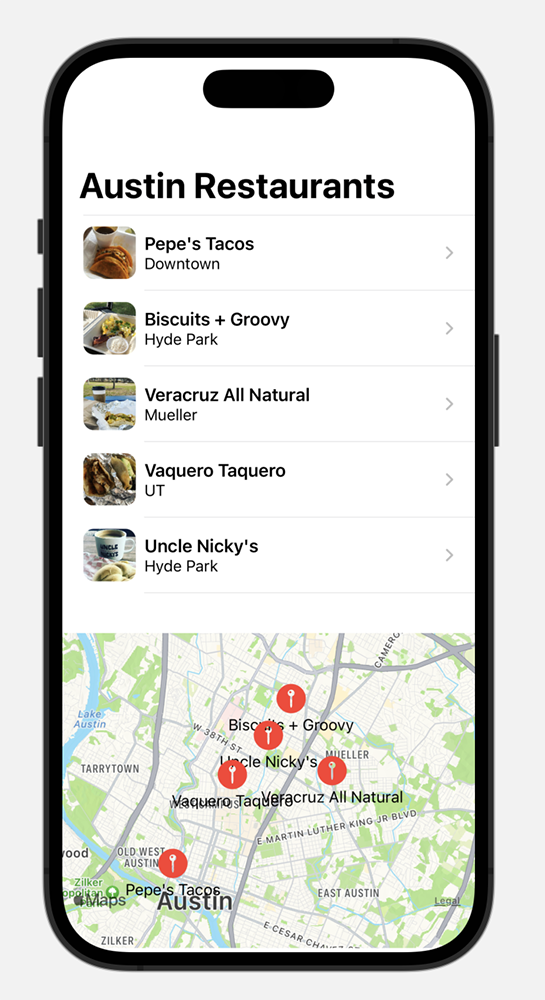
Create a List from the Data
We will use SwiftUI's List feature to read in our data. This is similar to the Storyboard TableView. We will use it to read the data into a VStack. Include the code to the right in the Content View area. Notice how the code embeds VStacks and HStacks (horizontal stack) to create desired layout. These can seem a little tricky at first, but they provide the basic interface features of SwiftUI. The list command is what reads the data, providing imageName, name and neighborhood. The other statements with the dot notation are related to the modifiers for sizing and fonts, etc.
In order to see images with the Image command, you will need to put the images in the Assets folder and refer to them with the name in the dataset (rest1, rest2, etc or use the names of your files in the dataset). You can find images associated with the restaurants in my data in this folder.
After you get your images in the Assets folder and named properly and the code in your interface, you should be able to see a preview of it reading into the List. You can also run it in the Simulator. You can see how powerful SwiftUI is in getting us to this step quickly with minimal coding and without using the clunky Storyboard interface.
Navigation View
Let's add a Navigation View that will allow us to add a title and provide some other options. See the code to the right. We are encasing our code in a Navigation View and adding options for title and style (I like the PlainListStyle, which is a NavigationView option). Be extra careful including proper opening and closing curly braces. When you scroll the list, the large title disappears, but it is replaced with a small title in the navigation area.
Navigate From Table Cell
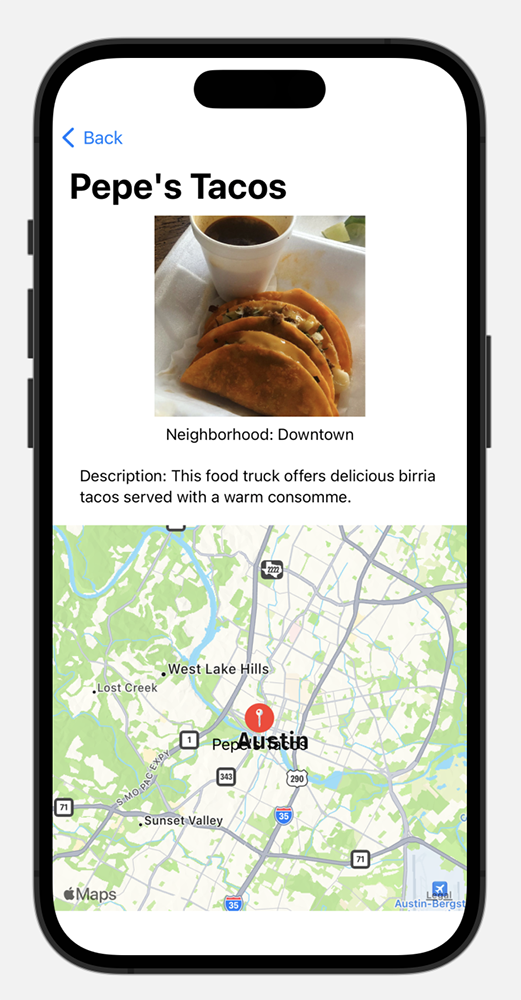
We want to be able to click on an item and go to a screen for that item. Include the code to the right as its own struct below the ContentView struct. This is the DetailView that will populate programatically. It will include the Image, Neighborhood and Description, and the title will pull from the Name. Notice how the entire layout is handled by the options.
Then in the ContentView, modify that code to include a NavigationLink. As always, pay careful attention to opening and closing curly braces.
This code is a new struct that you place below the ContentView struct.
This is what the ContentView should look like now, adding the NavigationLink line that sends it tothe DetailView
Add a Map to the Detail View
To include a Map, import MapKit at the top of the file below where you import SwiftUI. Then in the DetailView struct, include the @State declaration for region at the top of the struct and include the map lines within the struct after the last item, but still within the VStack, to align it vertically with the other items. The Map code provides annotations for the name just below the map pin using the offset option. Feel free to play with the options to see what you get.
You should now see the proper map for each restaurant when you go to the DetailView.
Add a Map to List Page
What if we wanted a map for the List page that shows all the restaurants? We can do that! Back in the ContentView add the @State variable for region that controls the map center and zoom level. And add the Map code into the VStack, which will go below the content. This area also provides options for styling the annotations. The frame and padding options at the end apply to the entire map. You can experiment with other options for your desired interface design.
After adding the code, you should be able to see a map using our lat and long data for all items in our dataset. And if you add items to the dataset, it will autmatically incorporate them. Exciting, right?!
Did You Get It All To Work?
The code to the right is the full code for the ContentView. If you have errors, check the code to see what you missed. Be careful with properly closing curly braces and other syntax issues.
Moving On
Great job! You have learned how to use SwiftUI to create an app with List and Detail Views that incorporates text, images and maps, and pulls from a dataset. Consider how you will use these techniques for other projects.