
iPhone App Development - Simple News App Exercise
What is it?
Swift is the current language for creating iPhone applications. It works within Apple's Interactive Development Environment (IDE) XCode. It is a combination of visual and programming interfaces.
Why should I learn it?
The world is mobile. While many content applications can function on phone browsers, there are some applications, like games, social media and ecommerce, that need native functionality.
What can I do with it?
You can create the visual interface as well as add code to represent functionality of your application using Swift and XCode. Then you can test and upload to Apple's App Store.
How long will it take?
Learning application development is a different and bit more difficult than creating websites. These tutorials will take several weeks to go through to explain the basic functionality available for application development. But with time and practice, you can master the skills necessary to create functional applications. Beyond iPhone development, there is native Android development and cross-platform options like React Native to consider.
Reading Data from Cloud Storage
Firebase is a web-based application that allows you to create an online database that can be accessed by your app. It is owned by Google, so if you have a Google account (like Gmail), you can use it to login to Firebase. If not, set up a free Google account.
Go to firebase.google.com and login.
Once you are logged in, you should see your account in the top right with Go To Console next to it. Choose Go To Console. Or you can go directly to the console at console.firebase.google.com/.
We will create a simple database to hold news headlines and story content. This example is based on the series of exercises starting with Firebase Tutorials for iOS. We will add this to the "headline" app you created in the TableView Exercise.
Now we need to get the XCode files to connect to our app. Click on Project Overview in the top left of Firebase. Click on the iOS logo to add Firebase to your iOS App. Give it a bundle id, which should correspond to what you named or will name your app (for example com.cindyroyal.headline) and give the app a nickname. Register App;. Choose Download Config File, which will save it to your Downloads. Make sure you are only signed in to one Google account in the browser. This plist file contains all the settings to connect your app to the database.
X out of iOS Setup. If you have already created the database, choose the database’s Setting (gear) icon to get back to these settings.
Creating the XCode Project
Use the XCode Project we created previously called "headline" in the TableView Exercise. The name will be added to your organization id (ie com.cindyroyal.headline).
Drag the .plist that you downloaded above and put in in the folder stack for the project (should be in your Downloads folder). Choose Copy Items If Needed and Finish. It saves a copy of the plist file in your folder. This is the one you will work with now.
Add Firebase SDK Using CocoaPods
We are going to use the dependency manager CocoaPods to add the Firebase SDK to our application. We’ll use the Terminal to install CocoaPods.Note that you do not type on the $ in the commands below. The $ just indicates a Terminal command line.
$ sudo gem install cocoapods
You will need to do this on computers where you have administrator password access. This is already installed on our computers, but if you are working on your own computer, you will need to do this. You can check to see if the computer you have has CocoaPods installed with the following command:
$ pod --version
Now that you have confirmed that you have CocoaPods, you will need to change to the folder that has your project. In Terminal, use cd to get into the project folder.
$ cd Desktop
$ cd headline
(This works if your project is on the Desktop in a folder called headline. Use your location and name). Use the ls command in the project folder to see a list of files.
In the headline folder, run the init command. This initializes the project with a Podfile.
$ pod init
In the Finder on your computer, open the Podfile (ctrl-click) in a text editor (Brackets or Atom).
Under #pods for headline, add the following and Save.
pod 'Firebase/Core'
pod 'Firebase/Firestore'
Back in Terminal, run the install command
$ pod install
This reads the podfile and installs the dependencies you need. You will see these items installing in the Terminal and you will see the Pods installed when you look in the Finder.
Now, in XCode, you will continue working on the app in the .xcworkspace file (not the xcproject). So close the project and reopen it in XCode as the .xcworkspace file. Run the project, just to make sure it builds without any errors.
In XCode, open AppDelegate.swift. Add import Firebase below import UIKit.
import Firebase
In the func application in the didFinishLaunchingWithOptions, add this code before the return statement.
FirebaseApp.configure()
Now our app is connected to our Firebase database project!
Read from Database
We are going to replace the array that we created previously with the data from Firebase. Go back to Firebase and find your project. Click on Database and create a Cloud Firestore database. Make sure to start it in test mode. This adds the true values below to designate that the app is being used for testing. A real application will need authentication before going live.
Removes authorization for testing in Firebase. See this under Rules.
read: true
write: true
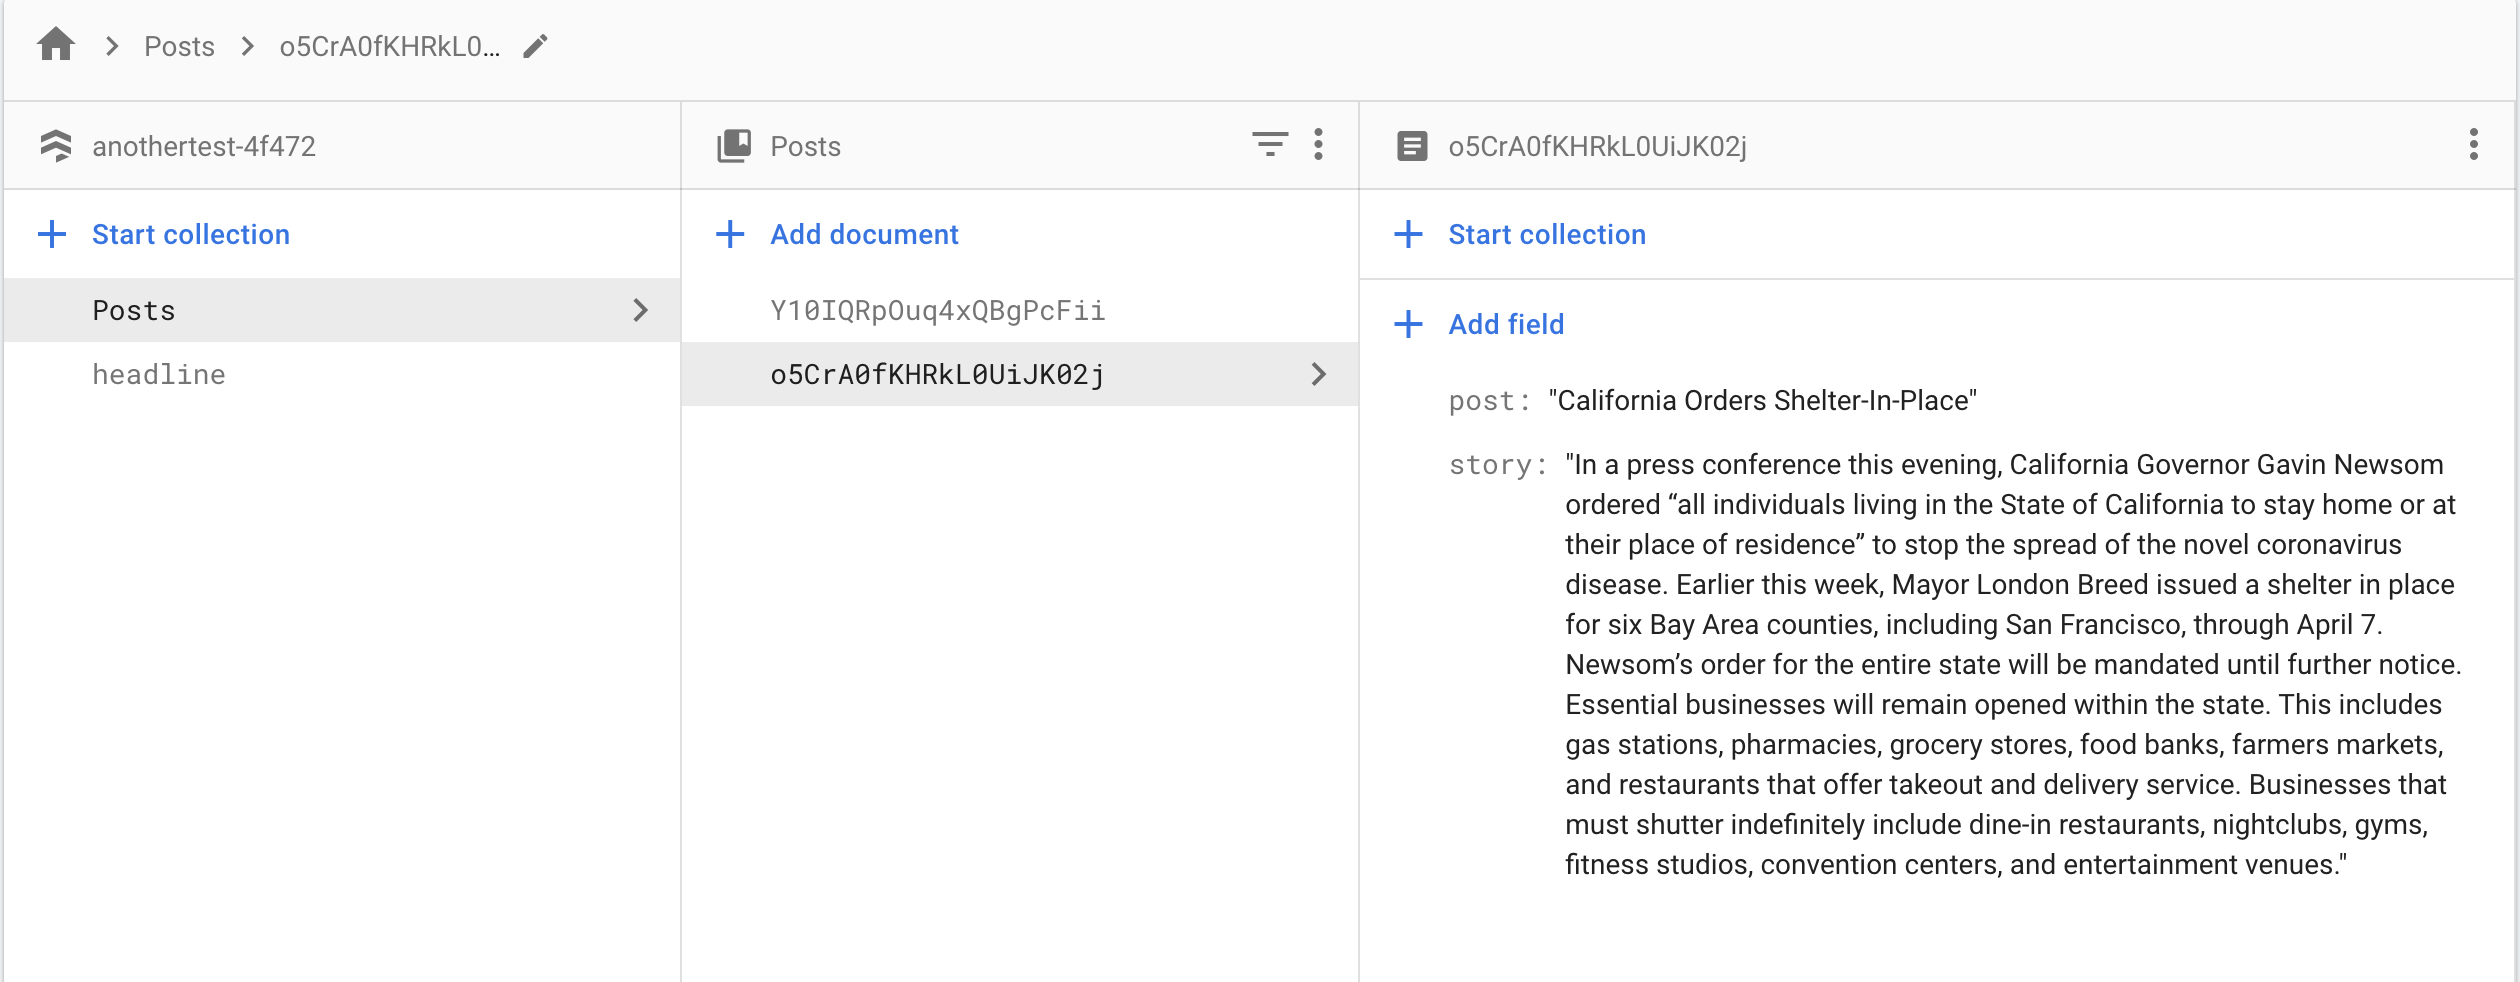
We will creat a simple database that will store posts and stories in the "post" and "story" fields. The Firestore organizes data into Collections. Each record in a Collection is called a Document. Documents contain fields that hold the data.
Click on Database in the sidebar if you are not already in that area. Click on Start Collection and name it Posts. You will be asked to include your first Document. Leave the Document ID field blank, because we will use Firestores Auto-ID feature to give each document a unique ID. Your first document will have the field "post". Give it the value of any news headline you would like to use. Choose Add Field to add a second field for "story". This should be the longer story to accompany the headline. Since this is text, leave the type as "string" but you can see other types that are available. Save the Document. Then choose Add Document to add a second post and story in the same manner
Your Firestore database should look something like this:
Back in XCode, remember that we are opening the .xcworkspace file that we created when we installed the Podfile. Open AppDelegate.swift. Add import Firebase below import UIKit.
import Firebase
In the func application in the didFinishLaunchingWithOptions, add this code before the return statement.
FirebaseApp.configure()
Now our app is connected to our Firebase database project!
In the View Controller, include the code to the right in the appropriate areas.
TableView Functions
Replace the tableView methods already in the ViewController from the TableView exercise with the ones in the box. The first one indicates the number of rows, based on the number of elements in newsItems. The second one reads the data from newsItems into PostCell. This reads the posts into your TableView.
This will read the items from the database and display them in the TableView which is connected in the code, named "theNews."
Test your app. You should be able to read data from your database and see it presented on the first View Controller.
Navigate From TableViewCell
One additional function performs a segue to a new View Controller (see code to the right). Remove the other two View Controllers we had created in a previous exercise so that the original ViewController (and Navigation Controller) and one additional ViewController are the only ones on the Storyboard. Remove the original Segues and create a programmatic segue from the original view controller to the second View Controller. Name it "theSegue". Create a swift file for the 2nd View Controller and connect it (File, New, File, CocoaTouch class, make sure type is UIViewController. Name it DetailViewController.swift. Then with the Identity Inspector, choose that file to connect it to the Storyboard VC.)
In the storyboard, create a label and connect it to the code as an Outlet named "subject". For the body text, we will use a TextView (a little easier to style). Connect it to the code and name it "body". These items will hold the "post" and "story" fields for the selected item from the TableView. Stretch these items out so they run across the storyboard. You may need to increase the label's lines to two, depending on the length of your headlines. In the Attributes Inspector, uncheck Editable, Selectable and Scrolling Enabled on the TextView, since we are just using to hold content. You can leave the greeking default text, because we will be replacing it.
You should still have your Navigation Controller from the previous exercise that handles the Back button.
Include the code for the didSelectRow function in the original ViewController and the viewDidLoad in the DetailViewController. The "selection" is passed to this DetailViewController to identify the correct item to display, based on the row selected in the TableView.
Now, when you run the app, it will segue to the DetailViewController and display the correct item.
Moving On
Great job! You connected your app to read a database and programmatically create a segue. Consider how you will use these techniques in your own projects. Next, we'll create an app that also writes to a database.