
iPhone App Development - TableViews
What is it?
Swift is the current language for creating iPhone applications. It works within Apple's Interactive Development Environment (IDE) XCode. It is a combination of visual and programming interfaces.
Why should I learn it?
The world is mobile. While many content applications can function on phone browsers, there are some applications, like games, social media and ecommerce, that need native functionality.
What can I do with it?
You can create the visual interface as well as add code to represent functionality of your application using Swift and XCode. Then you can test and upload to Apple's App Store.
How long will it take?
Learning application development is a different and bit more difficult than creating websites. These tutorials will take several weeks to go through to explain the basic functionality available for application development. But with time and practice, you can master the skills necessary to create functional applications. Beyond iPhone development, there is native Android development and cross-platform options like React Native to consider.
Reading Data From an Array
There are many ways you can work with data in an iOS app. By including an array of objects (similar to a JSON object) in the app, you can read those elements. You could also use a simple array, but in this exercise, we will demontrate the functionality of multiple variables read into a table, including images and maps. Ultimately, the table items will link to a detail view. We will work on an app that reads info about restaurants and presents them in a TableView.
Start with a new, iOS App project. (File, New, Project, App, make sure you choose Language: Swift & User Interface: Storyboard) Name it "TableStory".
Open the Storyboard with the Main file in the Project Navigator. Have the ViewController open (use Option when you click to have both Storyboard and ViewController file open.
First let's get our data in the app. See the code to the right. It is a list of a few restaurants in Austin. It includes a description, lat and long coordinates and a reference for an image for each item. Include this code in the area below the import UI statement and above the ViewController class declaration. This will assure that it is available to other view controllers in the app when we make them later. The struct declaration allows us to declare variables of multiple types and use them in the code. The variables coincide with the properties in the dataset.
Be sure to include these items in the code ABOVE the ViewController class declaration
TableViews
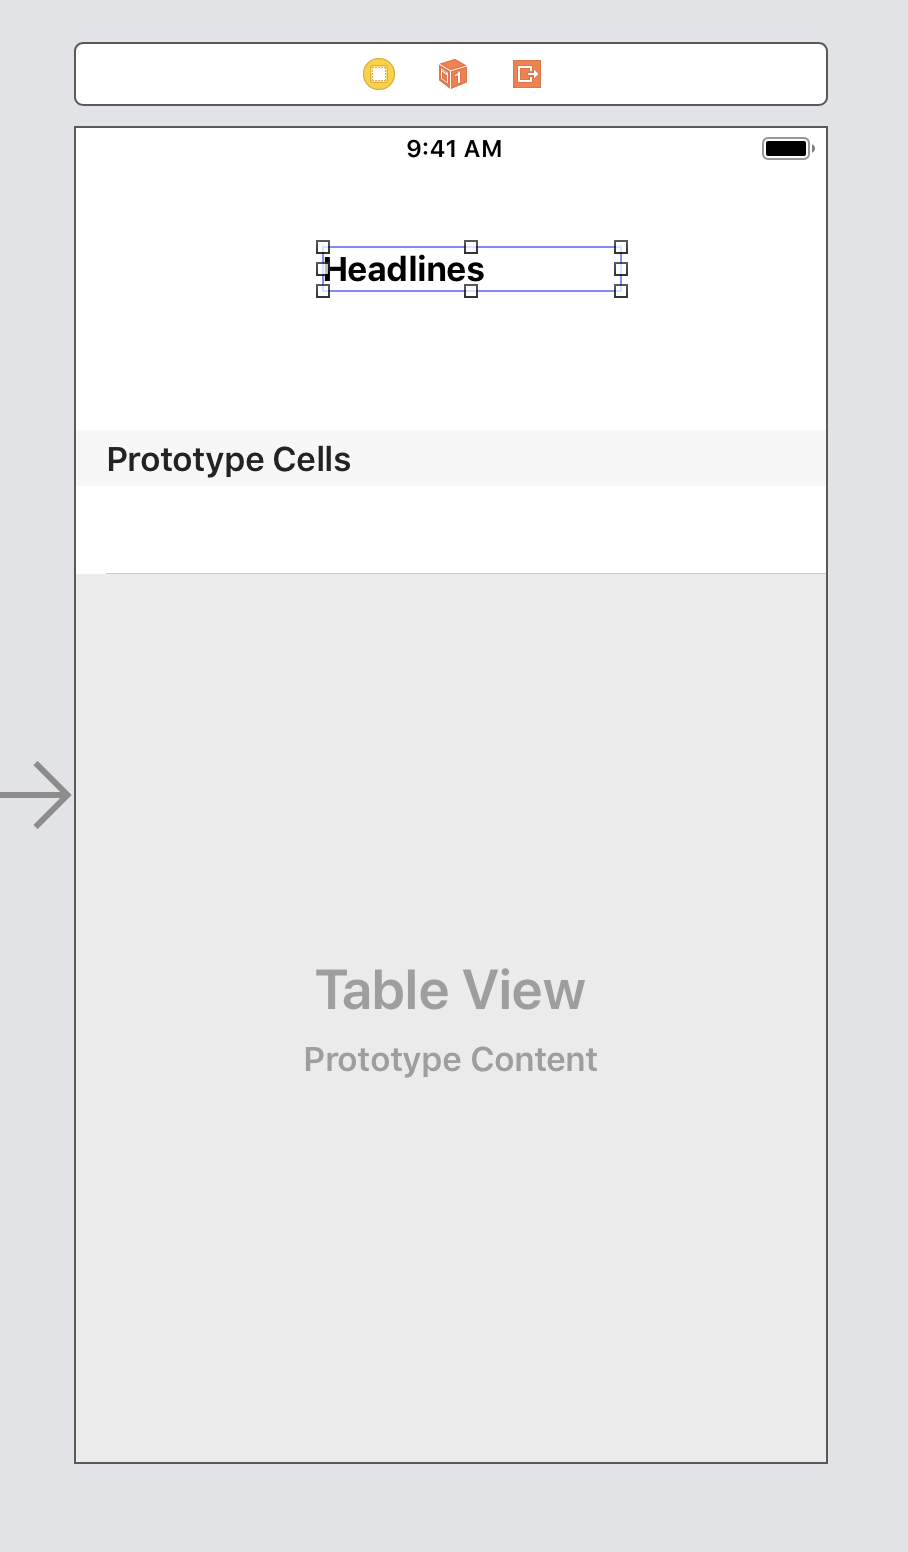
Now we will setup a TableView to read and display the items. On the Storyboard, add a TableView from the Library, have it fill the screen, except for some space at the top for a heading Label. Connect it to the code within the ViewController declaration as an Outlet named "theTable".
Add the code in the box to the designated places. It will introduce errors that will be fixed below.
Click on TableView and choose 1 for Prototype Cell in Attributes. Choose the TableView Cell and give it a Identifier of "PostCell" in Attributes (make sure you have the TableView Cell selected). Select Basic for the Style, and it will include an image in the cell (you could also include subtitle, which also includes an image). We will work with the images below, but for now, choose one of the images in the dropdown. The PostCell identifier is what will be used in the code for the TableView.
Your Storyboard should look something like this. You can change the Headline to say Austin Restaurants or whatever headline you want to use for your app.
The class declaration will introduce errors that we will correct with the TableView functions in the next section.
TableView Functions
Add the two tableView methods to the ViewController to implement the Table View. The first one indicates the number of rows, based on the number of elements in our dataset (data). The second one reads the data from the data array into PostCell. For now, we are just reading the name into the Prototype Cell. We set up the cell reference for the tableView and the item variable represents what is in our data on each row. We use dot notation to indicate the property in our data, for example item.name gets the name for each line of our data.
You should be able to run the app and see the items from your object. If you change the data object, add items to it, you will see it run with new data displayed.
Add Images
Recall above we used the Basic Style for our TableView Cell, which includes an image. In our dataset, we have several image references. These can be anything you want, as long as that is what they are named in the Assets folder (you could use the image names, but then those would need to be entered in your dataset). You can change the image names in the Asset folder. So get at least five images that you can use in your Asset folder with names corresponding to what you have as imageName in the dataset. You can find images associated with the restaurants in my data in this folder. Download these images and use in the example until you are ready to create your own images and content.
Change the cellforRowAt function to include the code necessary for your image to be read into the Prototype Cell. See the code to the right with the image references. This code changes the image reference strings in the data set to UIImage for each line of code. The cell references add the image, give it rounded corners and give it a border and color (in this case, the border and color just provide some spacing). The imageView outlet is automatcally available for the Prototype Cell with the Basic Style.
You may be wondering why there are question marks in the code after some of the commands. These assure we don't get errors for items that could be nil. The question mark indicates to ignore nil values, if possible. So be sure to copy the code as indicated.
Navigate From TableView Cell
We can navigate from a TableView Cell to a detail view to set up a screen for each item. Add a new View Controller (from the Library) to your Storyboard. On the main ViewController, from the ViewController button, create a segue to the new ViewController (Show). Select the segue (the arrow drawn to the VC) and give it a unique Identifier in the Attributes Inspector. Name the segue "ShowDetailSegue".
We need to create an additional function for didSelectRowAt (see code to the right). Use if statements to perform the named segue for array item. The statement data[indexPath.row] indicates the content in the array.
You can Embed a Navigation Controller in the original ViewController (Editor, Embed in, Navigation Controller) to assist with the Back navigation to your TableView. The code to the right for the didSelectRowAt function will navigate to the DetailViewController. If you test the code, it will take you to a blank Detail View Controller.
Pass Data to the Detail View
Now that we can navigate to our DetailViewController, we can set up our page. We are going to programmatically add data on a DetailViewContoller, so we need to create and attach a new .swift file. Choose File, New File, Cocoa Touch Class. Name it DetailViewController, choose UIViewController as subclass and Language, Swift. Once you have this page set up, using the Identity Inspector, you can connect this file to the new ViewController by finding the name DetailViewController in the list for class.
Add the item declaration to the DetailViewController class and the override function to the original ViewController. This allows us to pass the data to our DetailViewController, so we can use it to programmatically create a page for each restaurant.
Programmatically Add Data to the DetailViewController
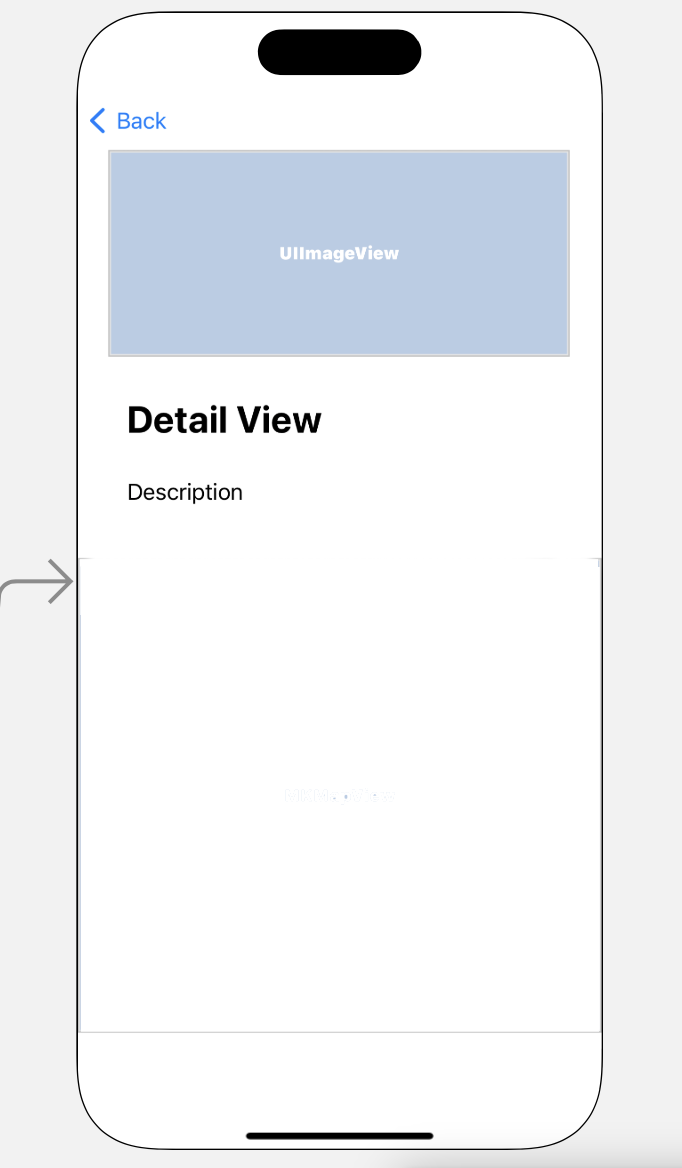
We add connections and code for the Detail page in this VC. Include labels from the Library on the Storyboard for name and description. Connect as Outlets in the code (detailName and detailDesc, respectively). Include an ImageView from the Library on the Storyboard. Connect as Outlet and name it detailImage. We will use these Outlets in the code to provide the data from the data array in the original ViewController. See the code to the right. It all happens within the viewDidLoad function that is automatically created when you make the page, because we want these items to appear as soon as the view loads. Include the code below in your viewDidLoad function.
Your Detail View should look something like this, including the embedded back button from the Navigation Controller you added:
Test the app. Make any changes you need to the Storyboard to make it look the way you want. You now have a functioning app with data from the original data array!
Adding a Map to the Detail Page
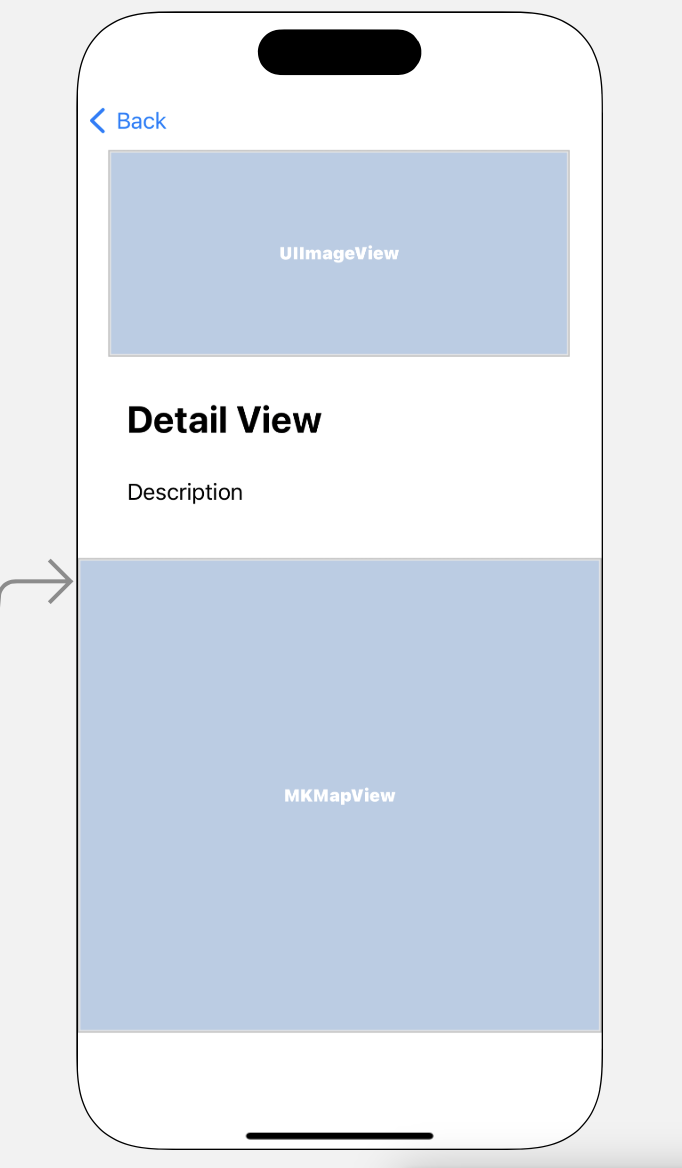
How about one additional feature? We can use Apple's MapKit API to add a map to our DetailView. Include the Import MapKit statement under the import UIKit statement on the DetailViewController. Add a MapKit item from the Library to the bottom of the Storyboard. Ctrl-drag to the code and make it an outlet named mapView with type UIMapKit. Then find the code to the right and include the map references in your viewDidLoad function. This code uses the lat and long properties from our data array to create the points on the map. The comments in the code explain what each line does. latitudeDelta and longitudeDelta values allow you to set Zoom level (smaller numbers Zoom closer).
Test the app with the Simulator. You should be able to navigate to a detail view for each item that now includes a map based on the coordinates from the data array.
Your Storyboard for the Detail View should look something like this, including the Map.
Adding a Map to the List Page
How about another additional feature (not covered in the video, but follow along for the code)? We can use the same technique as above to add a map with all points to the List View. Include the Import MapKit statement under the import UIKit statement on the original ViewController. Add a MapKit item from the Library to the bottom of the Storyboard. Ctrl-drag to the code and make it an outlet named mapView with type UIMapKit. Then find the code to the right and include the map references in your viewDidLoad function on the original ViewController. This code uses the lat and long properties from our data array in a loop to create the points on the map. The comments in the code explain what each line does. latitudeDelta and longitudeDelta values allow you to set Zoom level (smaller numbers Zoom closer).
Test the app with the Simulator. You should be able to see a map on the List View view that includes each item. Make any adjustments to map center or zoom level to show all your items.
Moving On
Great job! You have learned how to parse data from a data array into Labels, TableView, ImageViews and Maps. Consider how you will use these techniques for other projects.